Detect Mode
In this R3DS Track mode, you can get a sequence of JSON files with the detection of lip and eyelid contours. To do this, you need to:
Precompute frames. After that you can export them.
To improve the results of the precompute, you can personalize the detector, for which you need to select training frames and manually define contours on them.
If the result is still not accurate enough, then go back to step 3, and add frames to personalize the detector and compute bad frames again.
You can export the contours obtained using just the precompute, but in the R3DS Wrap4D pipeline, you may need more precise contours, for which the personalized detector is used.
Precompute Frames
- To precompute frames you need:
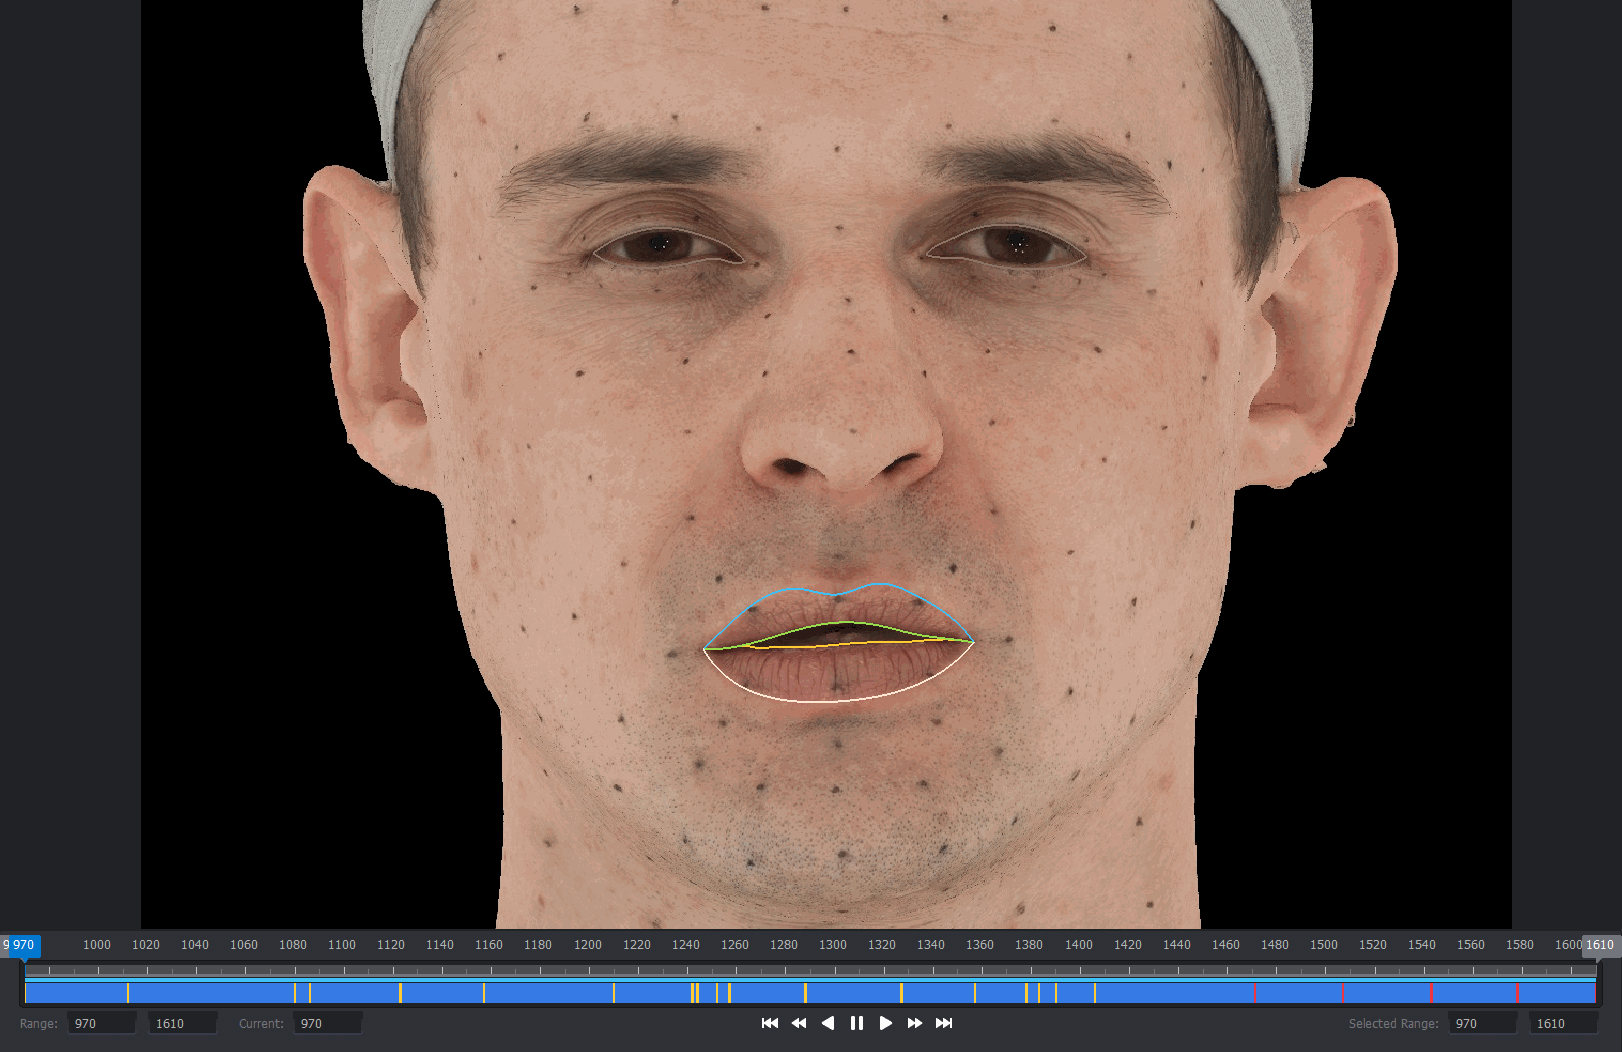
Select the sub-range on the timeline, where you want to detect the contours of the eyes and lips.
Press the Detect button.
The detection process takes some time, depending on the size of the detected range and computer resources. The detector uses a trained neural network for contours recognition.
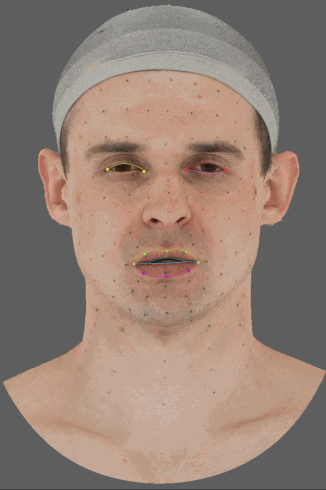
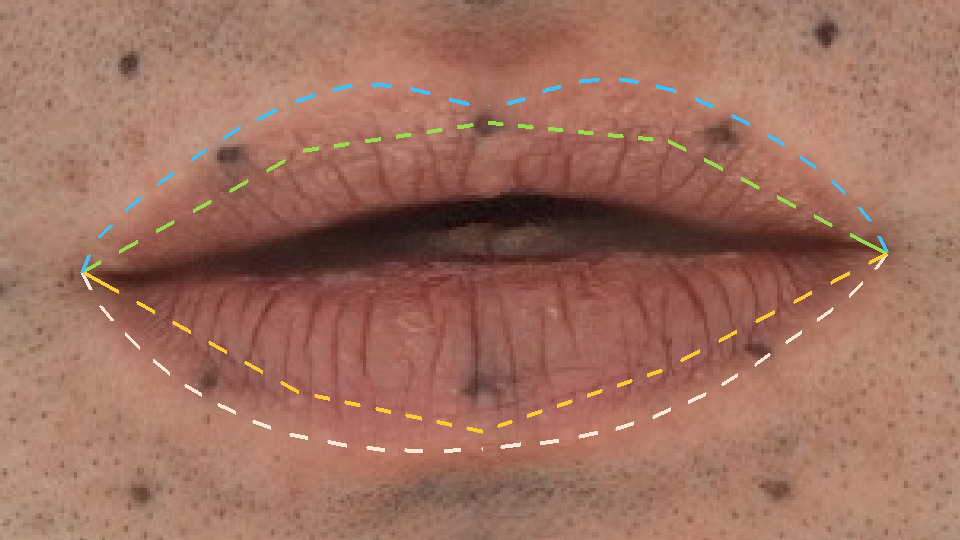
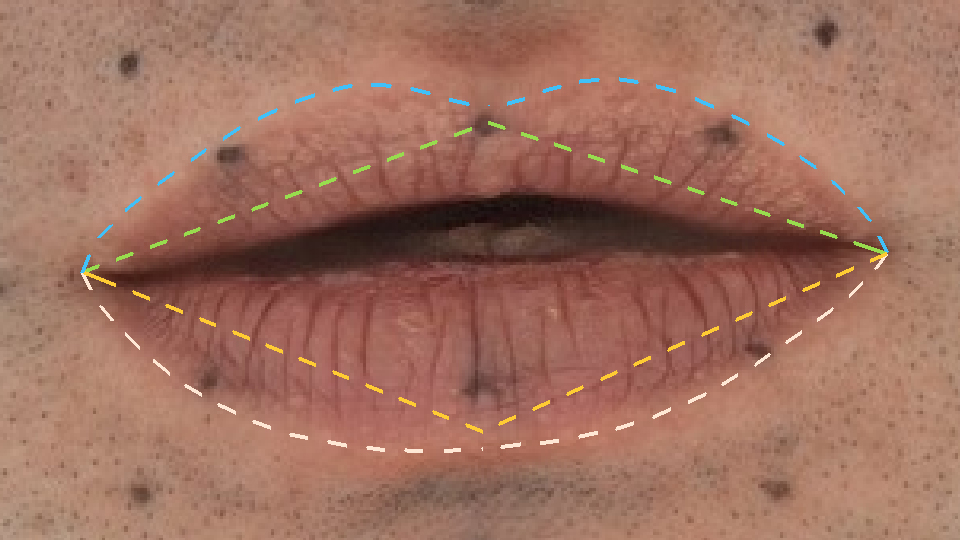
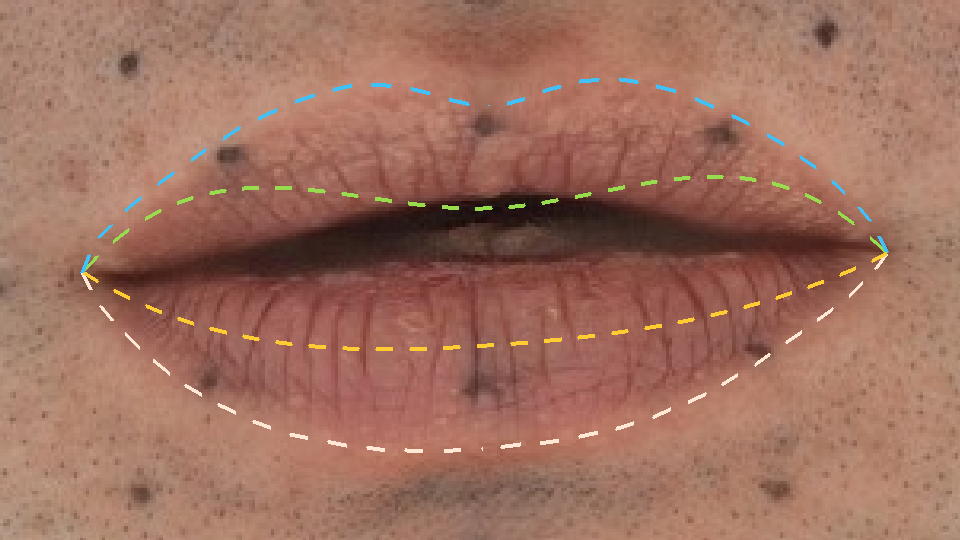
After the detection is completed, the selected frames on the timeline turn purple. If you go to one of these frames, you should see dashed contours in the viewport.
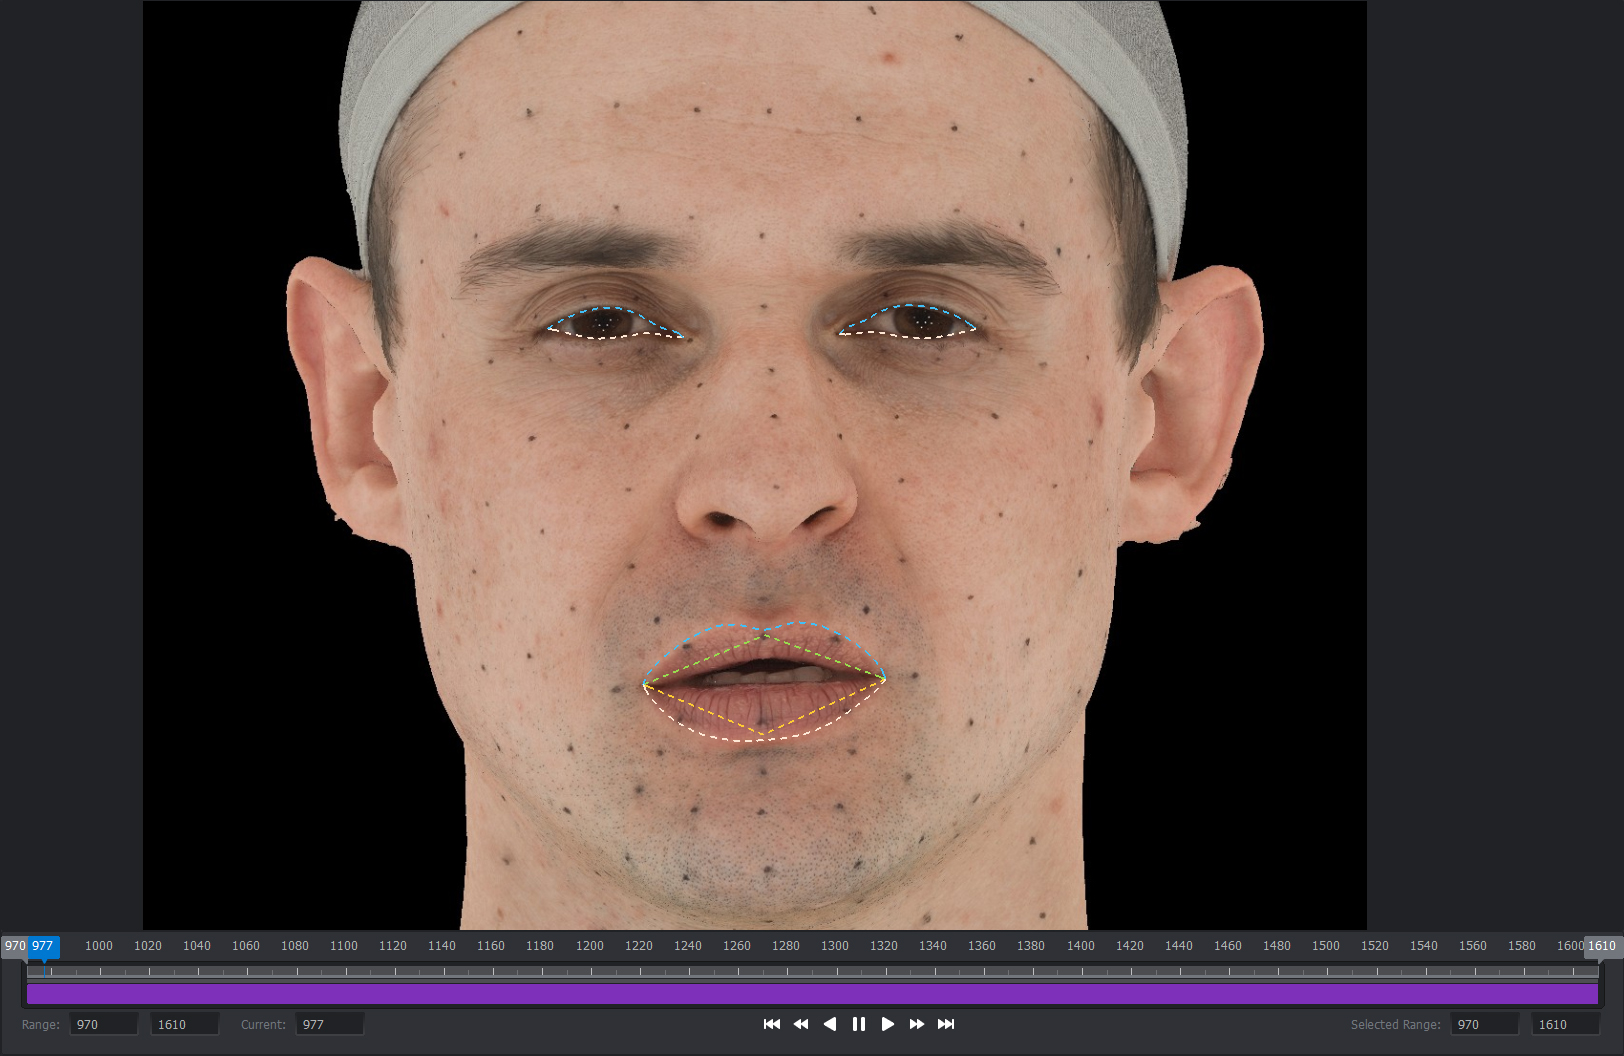
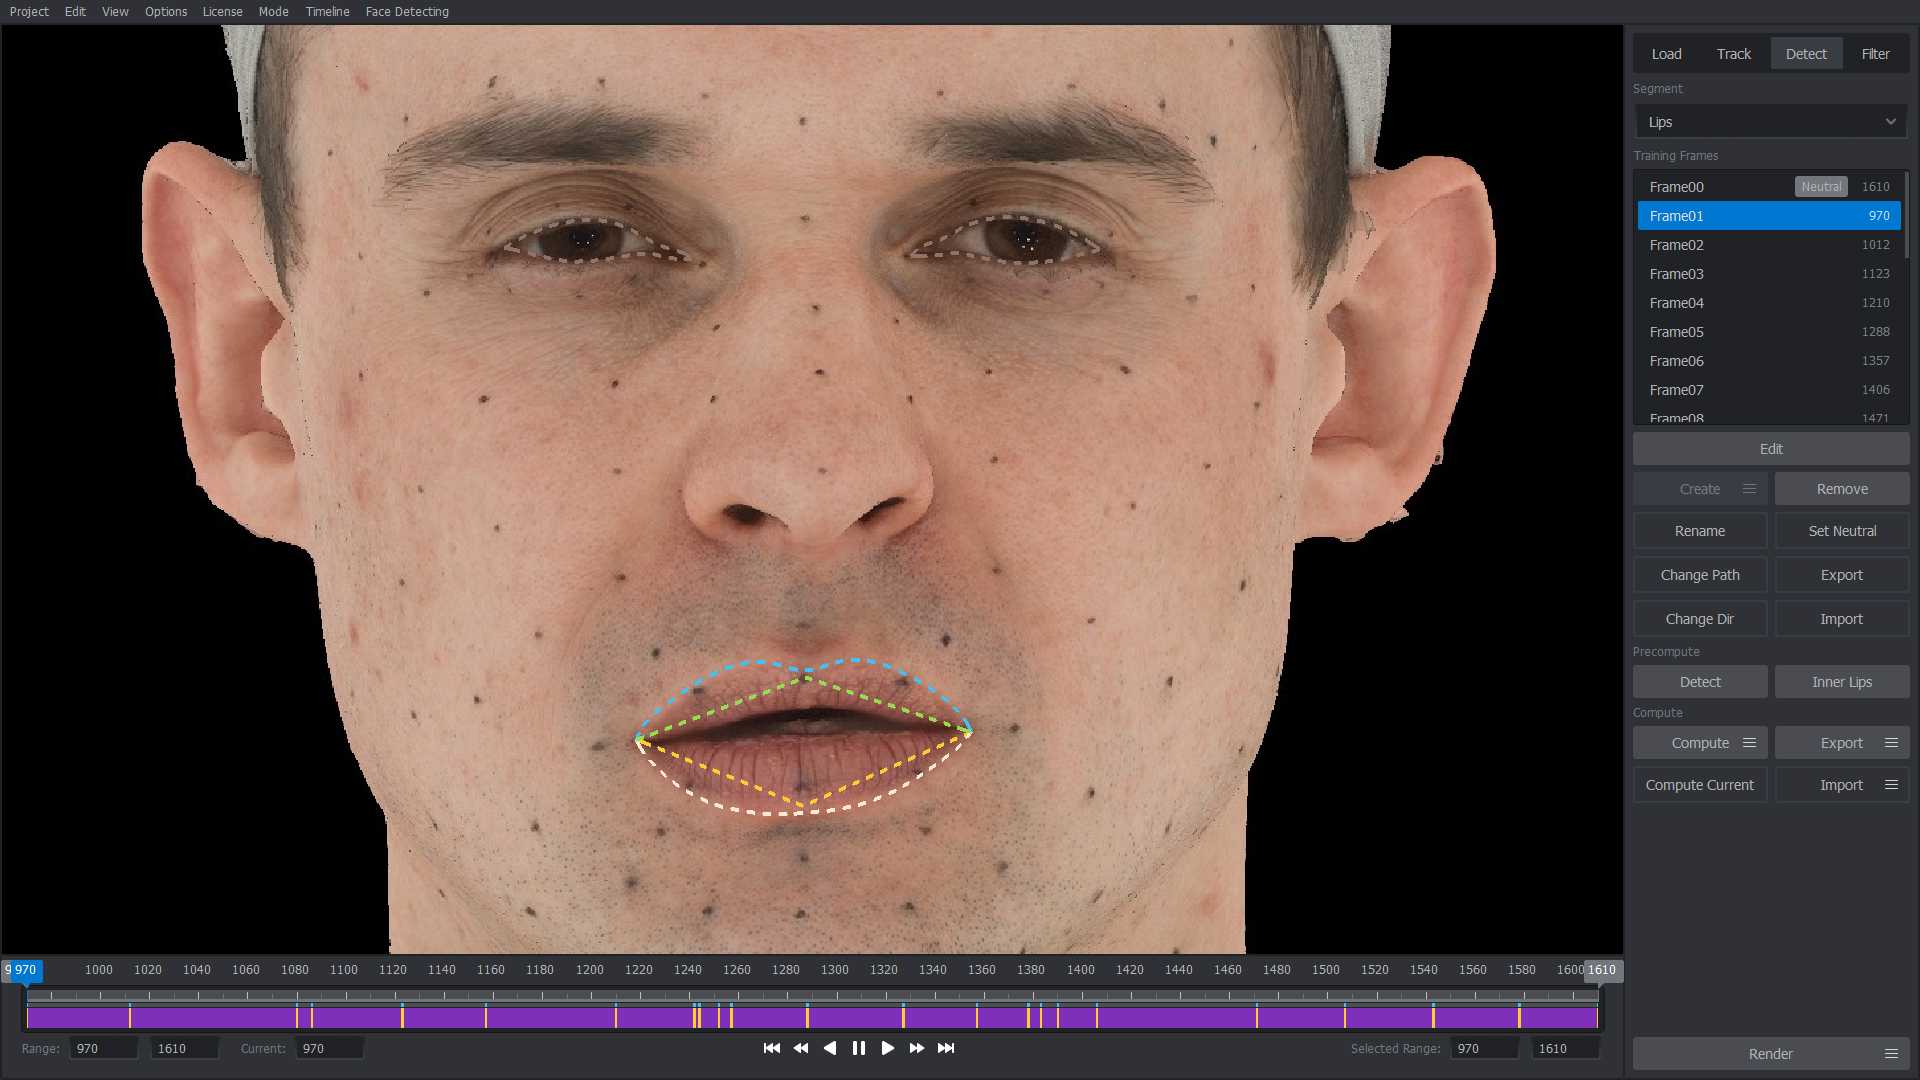
One group of the contours will be colored, and the rest will be gray. These groups are segments. In R3DS Track, by default, there are 3 such segments: Left Eye, Right Eye, Lips. To switch between them, use the drop-down list Segment. The precomputation is done for all segments.
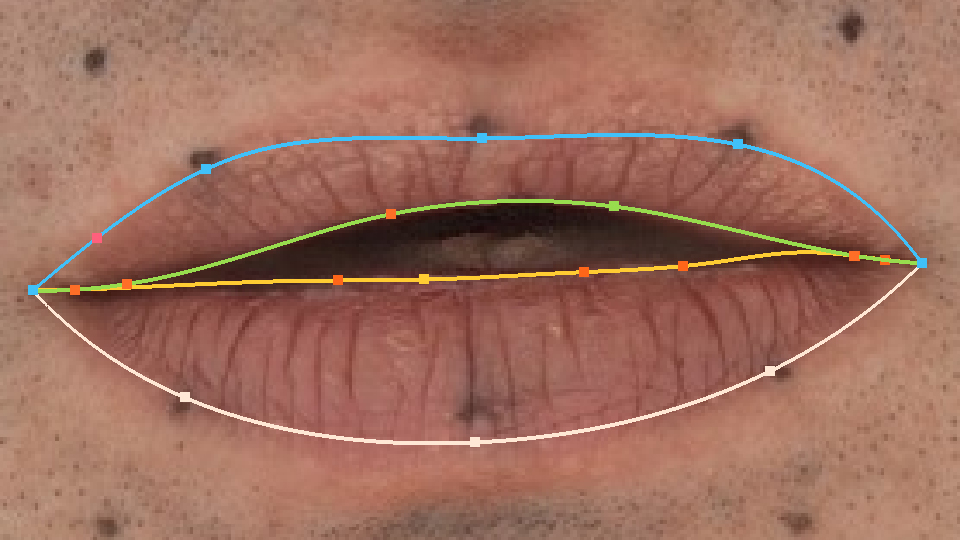
The neural network does not give the ideal approximation of the contours, and it is also unable to determine the position of the internal contours of the lips. Therefore, for internal contours, R3DS Track uses a mathematical approximation. Internal contours also appear after precomputation. However, their position depends entirely on the external contours of the lips. You can change the shape of the precomputed inner lips contours, by clicking on the Inner Lips button.
If you are completely satisfied with the quality and accuracy of the contours, you can export the detection of the contours at this very moment. In case you want to clarify the position of the contours, use the personalized detector.
Inner Lips Contours
You can adjust the dependence of the shape of the inner lip contours on the external ones by pressing the Inner Lips button.
Tip
You can disable the approximation of the inner lip contours if you do not need them, and you do not plan to use them in the pipeline. To do this, uncheck the Is Faking checkbox, then click OK. The inner lip contours should disappear from the frames in the viewport.
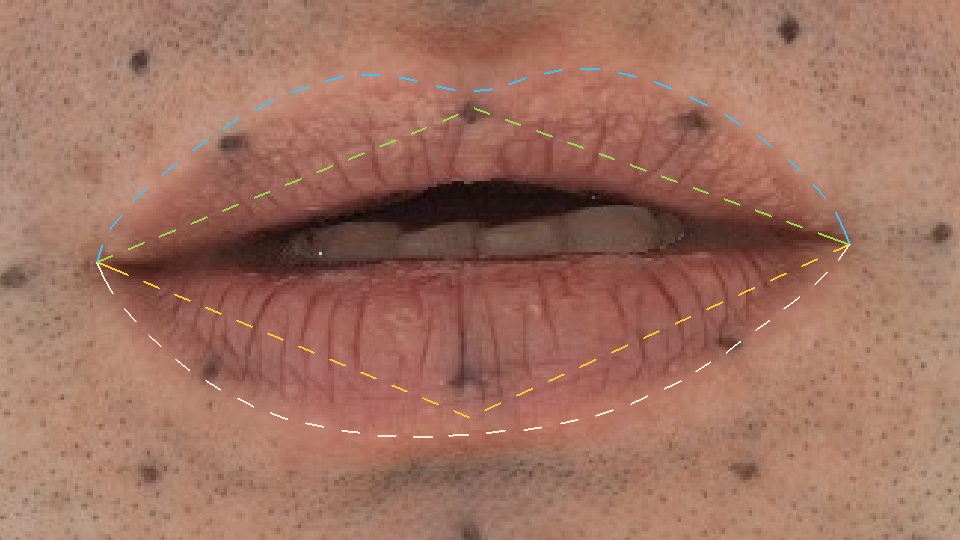
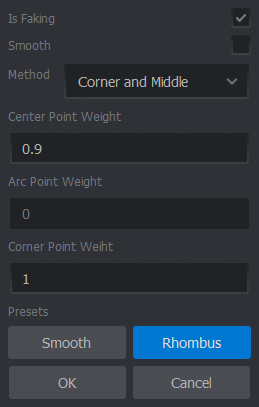
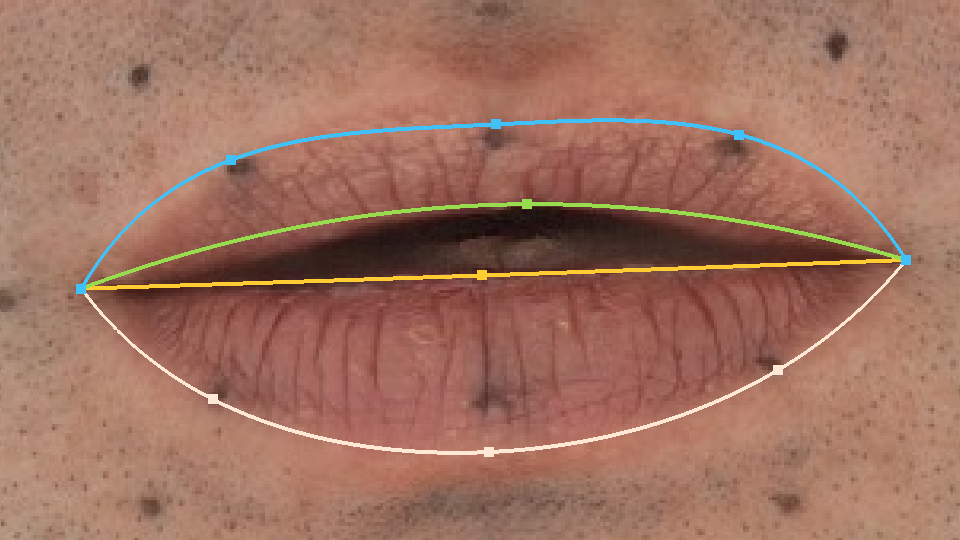
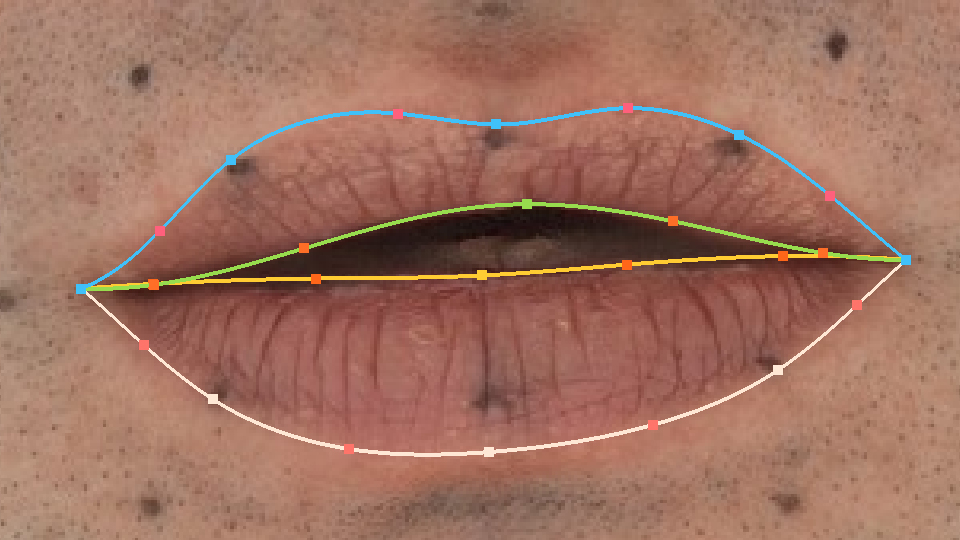
The inner contours are constructed through the points between the center of the mouth and the points of the external contours. For this, points in the corners of the lips and the central points of the upper and lower lips are used. You can also add intermediate points between them by selecting Corner, Arc and Middle in the Method drop-down list.

|
|
Corner and Middle |
Corner, Arc and Middle |
You can specify the weights of these points in the Center Point Weight, Arc Point Weight, and Corner Point Weight fields. They determine what the corresponding reference point is closer to: the outer contour or the center of the mouth.
Tip
Try different weight values to create the most satisfying internal contours shape. All changes are undoable.
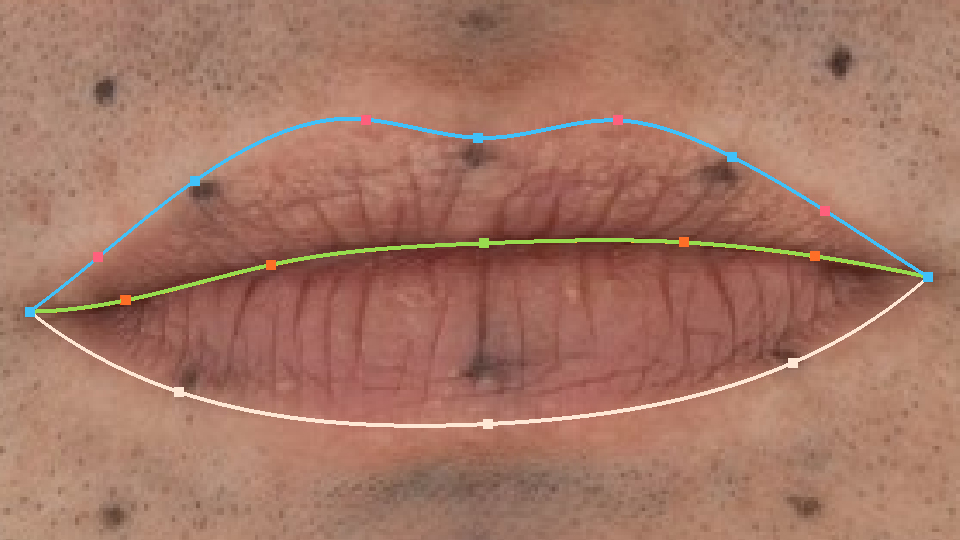
The Smooth checkbox determines whether the inner contours of the lips are smoothed or not. You can also select pre-configured parameters by pressing the Smooth or Rhombus buttons.
|
|
Rhombus |
Smooth |
Tip
You can adjust the shape of the inner lip contours both before and after the precomputation. In case you change the parameters, the inner contours will be overwritten.
Tip
The shape of the inner lip contours is not very important when computing. Set this shape in the most convenient way for you to annotate the positions of the inner lip contours on the training frames easier.
Personalization Detector
A standard detector uses a neural network to determine the position of the contours of the eyes and lips. However, he may be slightly sensitive to the personal characteristics of each actor specifically. That’s why the contours of the lips can lie inaccurately, and the contours of the eyes can look strange during blinking. To solve this problem, R3DS Track uses a personalized detector.
To correct the positions of the contours of the precomputed frames of the sequence, you do not need to correct the contours of each of them manually. You only have to select the set of training frames and annotate them. When you compute these frames, the personalized detector looks at their precomputations and takes data from accurately and consistently annotated training frames. It interpolates and brings the bad contour positions in some frames closer to the good ones.

|
|
Precompute |
Compute |
We will call the personalization of the detector Annotation. It is fully based on a set of training frames, tailored for a specific actor. You can reuse it by, exporting it from the current project, and then importing it to others. It is best to use it for other projects with actors who have similar facial expressions.
It’s worth starting the personalization of the detector with the right choice of training frames.
Training Frames Selection
When you precomputed frames from a sequence, you can select training frames to personalize the detector and improve the quality of detection.
- Which frames to choose as training frames:
These should be such frames for which a standard detector may not work out so well. For example, extreme expressions of the face:
Eyes can be open, staring, closed, tightly shut. Frames where the actor blinks are also suitable.
For the mouth, it can be different lip shapes when pronouncing vowels, crooked lips, closed mouth, twisted grin, matched lips, or tense lips.
- How to create a training frame:
To create a training frame, select a frame on the timeline, and click the Create button. On the timeline, the frame will be marked in yellow, and a new element will appear in the Training Frames list.
Note
Training frames are created separately for each facial segment. This is to make it easier to choose extreme and complex facial expressions. After all, a frame in which the actor’s eyes are tightly shut might not be a necessary training frame for the lips and vice versa.
Tip
After you create the first frame for a segment, the dialog appears that asks you to adjust the number of semantic points. What they are and why they are needed will become clear after we edit the training frames. Until you haven’t done this, just click OK.
The frame will appear with the default name Frame##. You can change it by selecting the frame and pressing the Rename button or the F2 key.
One of the training frames of the segment will always be neutral. Such a frame is especially important for computation. But so far, what should be remembered is only the following. In a neutral frame, the expression of the lips or eyes should be as neutral and relaxed as possible.
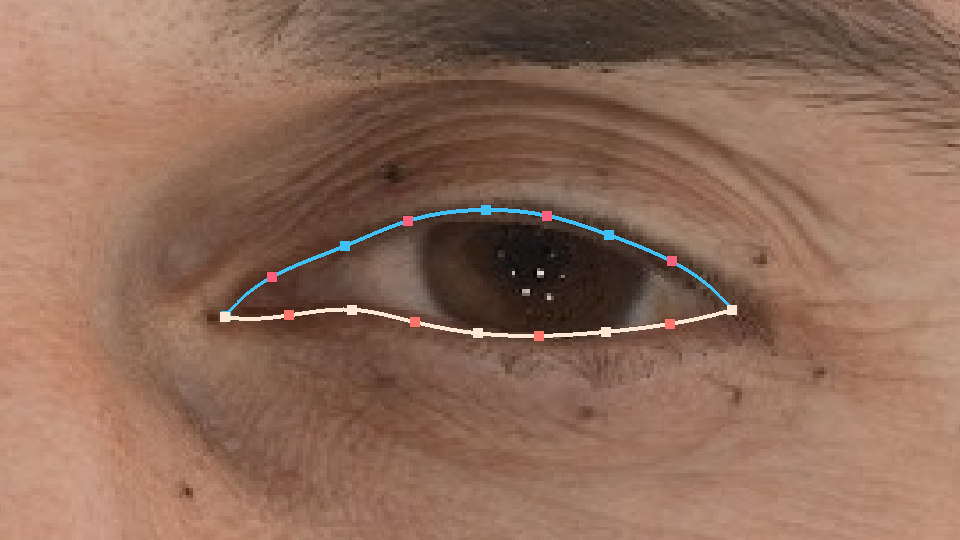
For the eyes, it is simply an open eye with a relaxed eyelid.
For the lips, it is a closed and relaxed mouth.
Tip
You can always reassign a neutral frame. To do this, select the required training frame on the timeline or in the Training Frames list, and click the Set Neutral button.
After creating training frames, you can edit them. This will allow you to complete the current phase of the detector personalization.
Editing Training Frames
To edit the created training frames, select one of them on the timeline or in the Training Frames list. Then click Edit or the E key. You can also enter the editing mode by double-clicking on the desired frame in the Training Frames list.
The timeline should disappear, and additional points should appear on the contours of the selected segment.

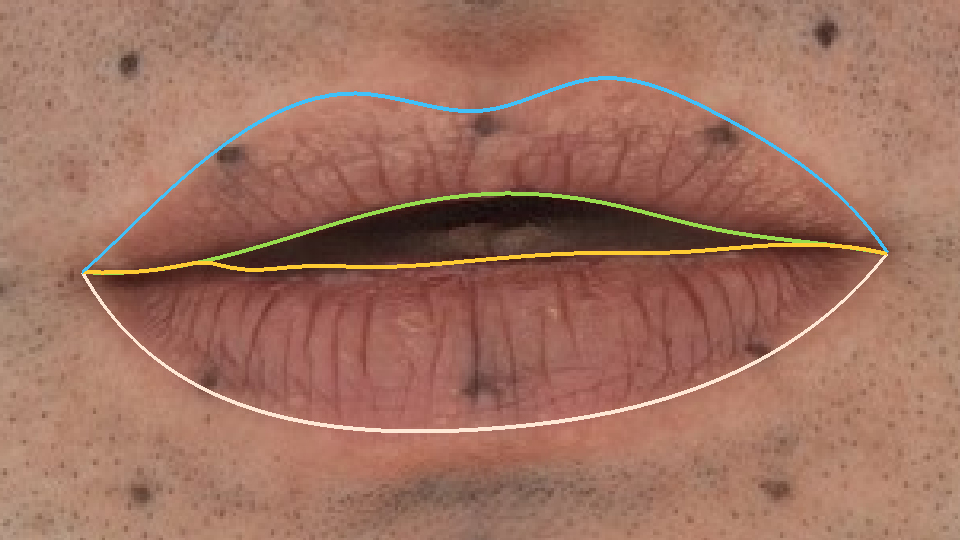
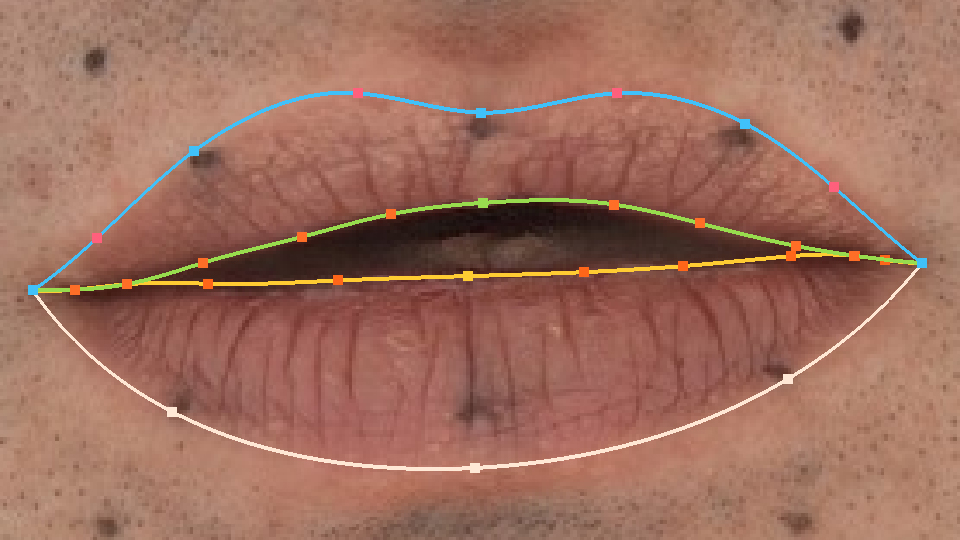
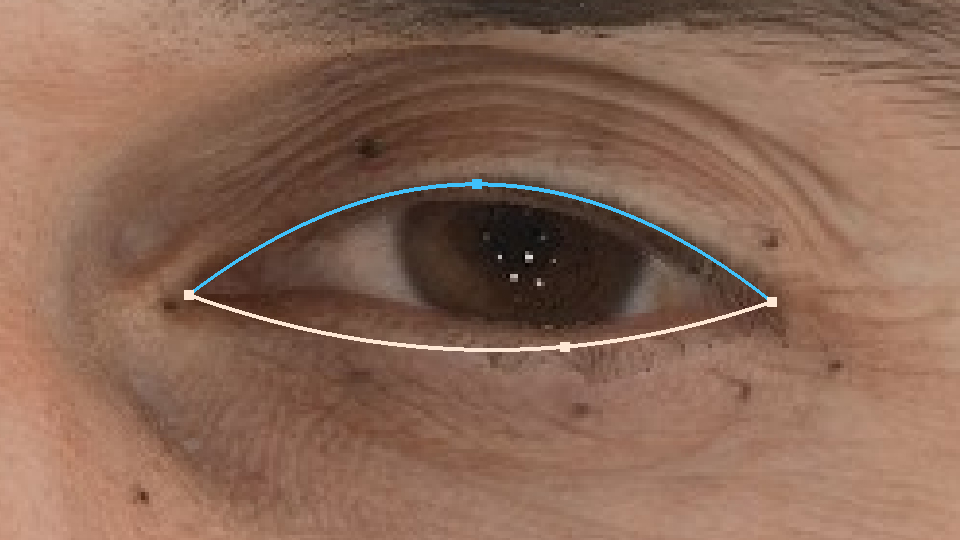
R3DS Track uses a spline system to annotate training frames. There are points on the contours in the viewport that you can move, and you can also click anywhere on the contour to add an extra point.
- There are two types of points on splines:
Semantic that appears on the contour at the time of creating the training frame. They are indicated in the same color as the contour itself. You can move them, but can’t delete.
Extra points that you put on the contour yourself by clicking in a place without points. You can also drag and drop and remove them by clicking on them while holding CTRL.
|
|
Only Semantic Points |
With Extra Points |
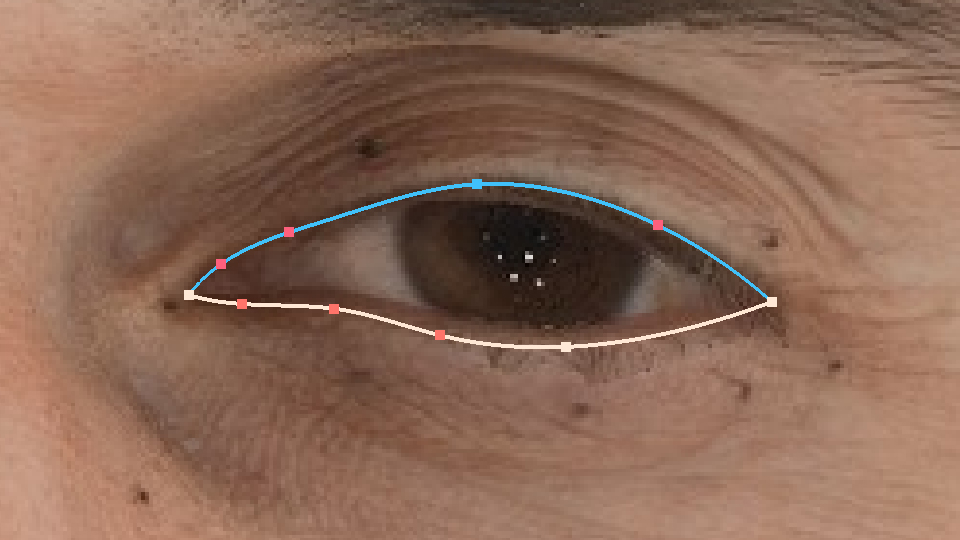
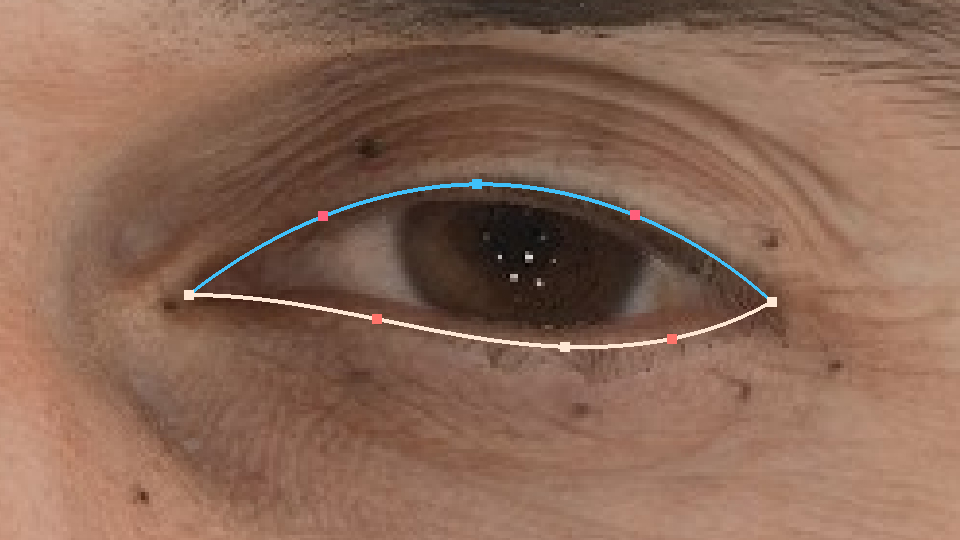
- Purpose of editing:
The main purpose of editing training frames is to put splines as closely as possible to the real contours of the lips or eyes.
An equally important purpose is to do it consistently in all training frames.
|
Neutral Frame Annotation |
|
|
NonConsistent Annotation |
Consistent Annotation |
Note
Consistency of frames is determined by the position of semantic points. Place them on landmarks or points that are easy to identify with different facial expressions. It can be the corners of the lips or eyes, the centers of the upper and lower lips.
Warning
Inconsistent training frames will result in poor performance of the personalized detector.
Tip
Extra points DO NOT affect consistency, use them to achieve a better contour shape.
When creating the first training frame, you should select the number of semantic points for the contours.
Tip
How to choose the right amount of semantic points? Count the number of points in the image that you can consistently annotate from frame to frame. Consider the eye example: it is always the corners of the eye (2 points). If additional landmarks are placed on the eyelid, you can also consistently annotate them. If the actor’s eyelids have 3 landmarks on each eyelid (as in the picture below), then the number of points that you can track for the eyes is 2 + 3 = 5. When creating a training frame for the eye, specify the number of semantic points not exceeding 5.
Tip
For lips, the amount of semantic points is initially increased due to the structure of the lips. And it is almost always possible to track the center point of the lip. Think carefully about the right amount of semantic points because the number of points that you will need to annotate consistently depends on your choice.
Warning
This amount cannot be changed only if you do not remove all the training frames in this segment.
- How to annotate training frames:
To annotate training frames well and consistently:
Drag and drop semantic dots onto the same landmarks.
Create extra points to improve the shape of the contour.
If you need to edit the positions of very close contours (sticky lips effect), then you can lock one of the contours by holding the SHIFT key and clicking on the contour. After you cannot select it and move points on it. To unlock the contour, hold down the SHIFT key again and click on the contour.
To better see how the contours lie on the frame, you can hold the V key. While it is pressed, all contours are hidden.
Compare the annotation of the current frame with the annotation of the neutral frame. To do this, hold the N key. Try to ensure that on different frames, the semantic points lie on the same landmarks.
Tip
When you move the cursor close to the contour, a white point appears on it. When it coincides with an existing point, and you click on it, you can grab and drag it. If it is just on the contour, then by clicking, you will create a new extra point.
To switch to another training frame in the edit mode, simply click on the desired frame in the Training Frames list.
When you finalize the training frames, you can press again the Edit button or the E key to exit the edit mode.
You can select more training frames, to annotate them. If you annotated all the basic extreme facial expressions of an actor, then the detector can be considered personalized.
To see how better the personalized detector will compute the positions of the lips and eyelid contours, compute the frames of the sequence.
Compute Frames
Now, when you have selected and annotated training frames, you can compute.
Note
Make sure you have at least 2 training frames. One of them should be neutral. The number of semantic points on the corresponding contours must match.
- To compute:
Select a range you want to compute. It should contain already precomputed frames. Only precomputed frames will be computed.
Press the Compute button.
The computation can take some time. After it is done, all the computed frames will be marked in blue on the timeline. When you go to one of these frames on the timeline, in the viewport, the contours should be indicated by a solid line.
Tip
If one frame of the selected range was both computed and a precomputed, you can switch between their displays by pressing the A key or in the toolbar View > Toggle Show Computes.
Go through the entire range of computed frames. If all contours have improved, you can export the results of contour detection. If some contours are still not accurate, you can personalize the detector and add a few more training frames with the most inaccurate results of the computation.
Generally speaking, you can do as many such iterations as you need. You can read more about how to implement workflow with computations here.
Compute Workflow
After you compute the range of frames the first time, it is most likely that you still will not be happy with the result. After adding new training frames you can recompute the desired range. Also, it is possible to compute with different settings.
Tip
Presumably, you will recompute the frames in order to improve the results only in frames with particularly bad results. There will be a few of them in relation to the overall size of the range. You can compute one frame selected on the timeline by pressing the Compute Current button or the X key. This will save you time and will not affect the selected range on the timeline.
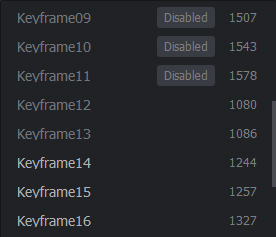
Sometimes inconsistent annotation or too many training frames can worsen the computation of some frames. To avoid this, you can temporarily disable some of the training frames. To disable a frame, select it on the timeline or in the Training Frames list, then press the K key. On the timeline, it will be marked in red, and the label disabled will appear in the list.
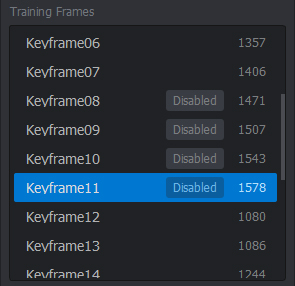
To enable the frame again, repeat the steps above.
Be careful when computing with disabled training frames:
Warning
It is impossible to compute when there are less than two enabled training frames.
Warning
You can’t compute if a neutral frame is disabled.
If you want to remove a training frame completely, select it and press the Remove or Delete button.
Export Detections
You can export the results of contour detection at any stage of work with Detect mode, both after precomputation and computation. To do this:
Select the range on the timeline for which frames you want to export the results of detection.
Press the Export button.
In the opened dialog, specify the folder in which the sequence of JSON files will be recorded.
You can configure in detail which frames and contours you need when exporting. To do this, click on the right side of the Export button. After that, you will see a dialog with the settings.
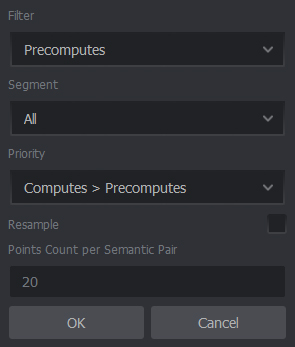
If frames of different types are present in the selected range on the timeline, but you need an only particular type of frames, you can set the priority of the contours and the filtering of frames.
- Filtering of frames shows from which frames of the range on the timeline you want to export contours:
Precomputes - from the frames that were precomputed.
Computes - from the frames that were computed.
Training Frames - from the frames that were selected as training frames.
- The priority of the contours allows you to specify which contours of all existing for the frame should be exported:
Training > Computes > Precomputes - if there is a training annotation for a frame, then its contours are exported. Otherwise, if the frame is computed, then the contours of the computation are exported. If not, the precomputed contours are exported.
Computes > Precomputes - if the frame is computed, then the contours of the computation are exported. If not, the precomputed contours are exported.
Precomputes - only precomputed contours are exported.
Hint
You can use Export with Priority Precomputes to simply export detection values without any processing, even if your project has training and computed frames.
- In the Segment list, you can select which of the facial contour segments you want to export:
All - for all segments (Right Eye, Left Eye, Lips).
Current - for currently selected segment.
If you want to change the number of points for the exported contours, set the Resample checkbox. The contours will be resampled before export, and they will have the same number of points calculated from Points Count per Semantic Pair between each pair of semantic points.
Hint
Enable resampling to equalize the number of points in computed and precomputed frames if you export both of them.
Import Detections
The main way to add the detection results to the project is to create them in R3DS Track. However, you can import them from the outside. To do this:
Click the Import button.
In the opened window, select the set of JSON files, which are named the same as frames of the project sequence. If the names are not comparable, the detection of the contours will not combine with the sequence of frames.
Frames will be imported into the project.
To configure the import behavior in detail, click on the right side of the Import button. In the opened dialog, you can set the type of the detection results to load, the overlay settings for existing detection results in the project.
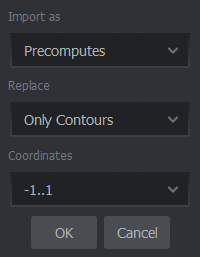
- In the Import as drop-down list, you can specify how you want to load the results of detection:
Computes - as computes.
Precomputes - as precomputes.
If the project already has any contours (precomputed or computed), then a situation may arise when the new data does not coincide with the existing one.
- You can select the method for resolving such a conflict in the Replace list:
Only Contours - only contours that do not coincide with existing ones will be overwritten.
Entire Frame - the frame will be overwritten for all segments.
Tip
Use Only Contours when importing contours for one segment and Entire Frame when importing contours of the entire face.
- In the Coordinates list, you can specify in which numeric range you expect the coordinates of the points:
1..1 - for normalized coordinates.
Image Size - if the positions of the points are determined in pixels.
Tip
Frames exported by R3DS Track always have normalized coordinates from -1 to 1. Therefore, if you import frames previously exported from R3DS Track, always use this setting. The second setting might come in handy if you received these files in third-party ways.
Compute Settings
By clicking on the right side of the Compute button, you can configure some features of the frames computation.
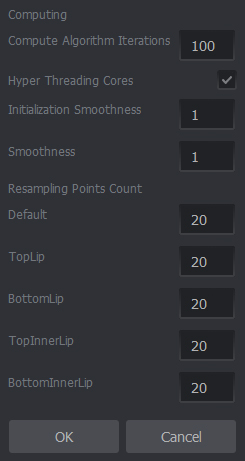
To optimize the speed of the algorithm, in the opened dialog, specify the Hyper Threading Cores checkbox if your computer has hyper-threading cores. This will help improve the parallelization of the computation.
Also, you can set Compute Algorithm Iterations to the maximum. The higher it is, the longer it may take to render the frame, but the more accurate the result of computation will be.
You can also configure a special number of points that will be placed between semantic point pairs on the computed contours. Initially, this number is 20, but you can change it if your pipeline has special rules for the number of points on the contours.
Initialization Smoothness parameter controls the smoothness of the initial contour. The initial contour is computed based on the output of the neural network (generic detector) on the Precompute step. Increase this value when the precomputed contour is detected incorrectly and contains spikes and artifacts.
Smoothness parameter controls the smoothness of the final contour. The final contour is fitted to lip and eyelids of the actor using the initial contour as a starting point. Increase this value is the fitting result that has spikey and artifacts. Setting the value too high will lead to under-fitting.
You can use a grayscale image instead of the original. This in most cases will not affect the quality but will double the speed of the computations.
Tip
You can separately set the number of points between semantic point pairs when resampling individual lip contours and also other contours.
Note
Changes made in this field will not affect the number of points of already created computed contours. You will have to count them.
Training Frames Settings
When you create a training frame, even before you annotate it, a certain number of semantic points will be placed on the contours. You can specify this number in the dialogue that appears when creating the first training frame on each of the segments.
Warning
All training frames that you use in the project should have the same number of semantic points for each contour. You cannot use a training frame with 3 semantic points for eyelid contours and a frame with 2 semantic points for eyelid in one project.
Semantic points are evenly placed on the contour. However, for example, 3 points are not always enough to accurately convey the already good precomputed contour. For this, you can use other modes of creating training frames. To do this, click on the right side of the Create button. In the dialog that appears, you can select the desired mode:
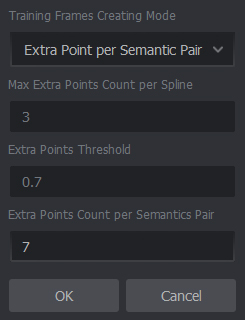
- The modes are:
Regular - a certain number of semantic points are simply placed on the spline. They are placed at an equidistant distance from each other.
Auto Extra Point per Spline - extra points in the amount of no more than Max Extra Points Count per Spline are also added to the semantic points of each contour. They best approximate the accuracy of the contour to the original precomputed contour. Extra Points Threshold - controls how carefully the position of such points is selected. The closer it is to 1, the more accurate the approximation, but the longer time it can take.
Extra Point per Semantic Pair - evenly places on the contour Extra Points Count per Semantic Pair between each pair of semantic points. Points are set equidistant.
|
|
|
Regular |
Auto Extra Point Per Spline |
Extra Point Per Semantic Pair |
Hint
Use Auto Extra Point per Spline for cases where the precomputed shape is good enough to reduce manual annotation.
Hint
Use Extra Point per Semantic Pair if you have a small number of semantic points but a rather complex form. For example, if you use only 2 semantic points for the eyes.
Import and export of training frames
After you annotate training frames for one or several segments, you can export them as annotations. To do this, click Export in the Training Frames section. In the dialog that appears, specify the name of the JSON format annotation file, in which the positions of the semantic and extra points will be stored, and also the paths of the frames the corresponding training frames are annotated at.
After that, you can import training frames into any other R3DS Track project with the same number of corresponding semantic points.
Note
Annotation, just like the project, does not store the frame files themselves, but only the paths to them. Therefore, keep in mind that when you import the annotation into another project, you will also need the frame files on which they were annotated.
Warning
If imported frames files are not detected in these paths, all imported frames will be blocked. It will not be allowed to use them for computation.
Warning
Contours that do not fit the number of semantic points of the project into which you are importing the annotation will be eliminated.
Note
In the event of a frame name conflict, you will need to assign new names to the imported frames. If you do not, the frames will be overwritten. Also, if both the current and imported annotations contain different neutral frames for segments, you will need to choose between them.
Since, in the general case, training frames that are imported may be annotated not on the frames of the sequence of this project, so you will not always be able to switch to them by clicking on the timeline. In the Training Frames list, such frames will have a darkened color and will be non-clickable. In any case, you can switch to them in the edit mode of training frames and edit them by double-clicking on them in the list.
If you are faced with a situation where the file paths for the imported training frames are not available or changed, you can change the paths to their files.
Training frames path changing
Since R3DS Track does not store the frame files themselves, but stores the paths to them, a situation may arise when these files were moved. If the paths to the sequence have changed, then the frame images will no longer be displayed in the viewport, and the frames will be marked in red on the timeline.
- To fix this:
If the training frames were annotated on the sequence frames, all you need to do is to specify the new correct path in Load mode in the Sequence field. Read more about it here.
If the training frames were imported and were previously annotated on other frames, or if the previous method did not work for some reason, do the following:
Click the Change Dir button. In the opened dialog, all folders will be displayed, frames from which were used for training frames in the project. On a similar basis when you select a frame for loading the sequence, you can adjust the paths to groups of training frames. To do this:
Either write in the appropriate field the new path to the folder.
Or click on the Folders icon and select one of the files in this folder.
After you specify all the paths, click OK.
You can change the frame path for a specific training frame by selecting it and clicking Change Path. In the opened dialog, you can enter the full path to the frame file or select it through the dialog by clicking on the Folders icon.
Rendering
If you want to see how precisely the contours are suitable for your pipeline and whether they are consistent in all the pictures, you can view them not only in R3DS Track. If the project is heavy, it may be easier to export image frames with the drawn contours to view them separately.
To do this, you can click the Render button. In the opened dialog, select the folder into which the sequence files with the contours drawn on top will be duplicated.
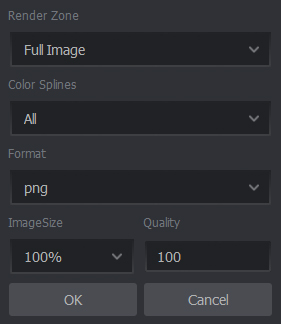
If you click on the right side of the Render button, then in the opened dialog you can configure:
Render Zone - which image zone to render:
Full Image - original file size.
Only Current View - only the part of the image that is currently displayed in the viewport.
Color Splines - color of the contours:
All - all contours are displayed in their colors.
Only Current Segment - the contours of the current segment are shown in color, the rests are gray.
Image Size - you can choose a reduced image size to speed up the rendering. The length and width of the image in pixels will become proportionally smaller.
Format - format of the image for saving.
Quality - general render quality.