 FacialWrapping
Only in Wrap4D
The FacialWrapping node is at the core of the 4D processing pipeline. In order to process a 4D sequence one simply needs to compute the FacialWrapping node for every frame of the sequence. Each frame can be computed independently thus the entire sequence can be computed in parallel.
When processing 4D sequences we usually work with hundreds or thousands of frames. The idea of the FacialWrapping node is to be able to produce a result that requires no manual cleanup.
However, this node can greatly simplify the process of wrapping separate FAC scans.
The FacialWrapping node is similar to the BlendWrapping node.
Just like the BlendWrapping node it uses a set of training blendshape meshes to analyze how different parts of the base mesh can be deformed. This training data greatly improves the quality of wrapping especially for extreme expressions.
You can use personalized actor blendshapes, generic blendshapes, or even blendshapes created for a different character. If you have a set of personalized actor blendshapes by the time of 4D processing, it will greatly improve the fitting quality. However, the method works very well even with generic blendshapes.
What’s special about the FacialWrapping node is that it also uses the results of facial detection for lip and eyelid contours during the fitting process.
The lip and eyelid contours should first be annotated on a neutral base mesh using a FacialAnnotation node.
The detection of the lip and eyelid contours is usually done with R3DS Track (using a personalized detector) or with a FacialDetection node (using a generic detector). However, one may pass the results from a custom detector using a sequence of JSON files in a special format.
The goal of FacialWrapping is to provide a robust and cleanup-free, yet not very accurate, result that can be later passed to the OpticalFlowWrapping node to achieve pixel level fitting.
Editor
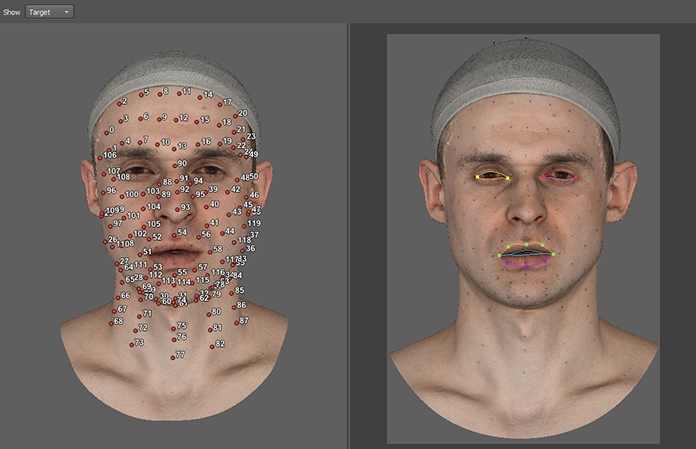
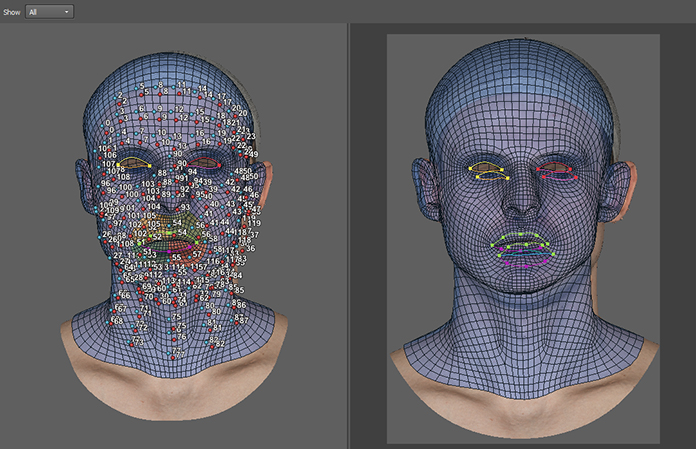
The FacialWrapping node has a visual editor that has two viewports. The left viewport displays the input models, points, and FacialAnnotation in 3D. The right viewport displays the same data plus the results of FacialDetection through the camera view.
The visual editor has the following display modes:
Show Basemesh
Only the base mesh is displayed on both viewports. You can use this mode to check the accuracy of the FacialAnnotation.

Show Target
Only the target scan is displayed on both viewports. You can use the right viewport to check the accuracy of FacialDetection contours.
Show All
Both the basemesh and the target scan are displayed. Use this mode to check that the FacialAnnotation closely matches the FacialDetection in a neutral frame of the sequence.
Inputs
- Floating Geometry
GeometryGeometry to be deformed (a basemesh)- Fixed Geometry
GeometryTarget geometry to fit to the Floating Geometry (a scan)- Point Correspondences
PointCorrespondences(optional) A set of point correspondences between the Floating Geometry and the Fixed Geometry- Excluded Floating Polygons
PolygonSelection(optional) A set of polygons that will be excluded from the wrapping process, i.e. they will not try to fit to the Fixed Geometry but will be deformed as rigidly as possible to match the rest of the mesh.- Alignment Points
PointsOnTriangleA set of points selected on either the Floating Geometry or the Neutral Reference (since they have the same topology).If Use Rigid Alignment is on, the points will be used to rigidly align the Neutral Reference to the Floating Geometry by orientation and scale. Then the same transformation will be applied to each Blendshape Reference.
The corners of lips and eyelids and certain points on the nose and ears are usually good candidates for the Alignment Points
- Facial Annotation
FacialAnnotation(optional) Facial annotation.- Facial Detection
FacialDetection(optional) Facial detection.- Camera
Camera(optional) Camera position and settings to interpret annotation and detection inputs
Tip
If all FacialAnnotation, FacialDetection, and Camera inputs are connected, the node will use the detected contours during fitting.
If none of the inputs are connected, the node will use the same method as the BlendWrapping node.
If some but not all of the inputs are connected, the node will return an error.
Output
GeometryWrapped geometry
Parameters
- Compute
starts the wrapping process in the preview window
- Auto Compute
if set, the node will be recomputed each time a parameter or input data is changed. This parameter is ignored during the batch processing
- Neutral Reference
the file name of Neutral Reference mesh
- Blendshape References
a list of file names of Blendshape References
- Use Camera Resolution
if set, the resolution of the Camera will be used. The camera resolution should match the resolution used in R3DS Track during contour detection
- Camera Width
a custom width of the camera that will be used if Use Camera Resolution is not checked
- Camera Height
a custom height of the camera that will be used if Use Camera Resolution is not checked
- Num Components
defines how much information will be taken from the Blendshape Reference. A bigger value leads to better model flexibility but comes with a cost in terms of robustness and speed. Increasing the value may lead to better wrapping quality but will slow down the computation. This value should not exceed the number of blednshapes used as Blendshape Reference.
- N Nodes to Use
indirectly controls how flexible the base mesh is. Increasing this value will make the base mesh less flexible and greatly increase the computation time. It’s recommended not to change this value and use Smoothness and Sampling Radius Final to control the base mesh flexibility
- Smoothness
defines how flexible the base mesh is. The bigger the value the more rigid the mesh. Increasing this value may prevent wrapping artifacts on noisy data but will also reduce fitting accuracy
- ICP
this weight defines the strength of fitting of the base mesh to the target surface. Increasing it will lead to tighter fitting but can mesh smoothness can suffer
- Control Points Weight
defines the influence of control points on the wrapping process. Higher values result in the tighter fitting of control points to their targets
- Detection Weight
defines the influence of the detected lip and eyelid contours on the wrapping result. Higher values will result in tighter fitting of eye and lip contours. Reduce this value if you experience mesh artifacts on eyelid and lips.
- ICP Iterations
number of Iterative Closest Point iterations
- Coarse to Fine Iterations
number of coarse-to-fine iterations. To explain in simple terms, on each iteration the algorithm breaks the base mesh into pieces and tries to fit each piece to the target geometry. With each new iteration, it breaks the base mesh into smaller pieces producing a tighter fitting
- Tolerance
a criteria to stop wrapping. The higher the value the earlier the fitting will be finished, the less accurate the fitting will be
- Sampling Radius Initial
the size of base mesh pieces during the first coarse-to-fine iteration. Defined in centimeters
- Sampling Radius Final
the size of base mesh pieces during the last coarse-to-fine iteration. Defined in centimeters. This parameter greatly
- Use Rigid Alignment
if set, aligns the Neutral reference to the base mesh (Floating Geometry) by orientation and scale. It applies the same alignment transform to the Blendshape Reference
- Use Retargeting
if set, for each Blendshape Reference it computes vertex deltas from the Neutral Reference to the Blendshape reference and adds the deltas to the base mesh (Floating Geometry) producing a personalized set of blendshapes
- Shape change threshold
a criteria to stop wrapping based on how big is the shape change comparing to the previous step. Increasing it will reduce the computation time but may reduce the fitting quality.
Tip
All the parameters are calibrated to work on models in centimeter scale. It’s highly recommended to scale your model to centimeters (you can scale it back after processing). If your model is not in centimeter scale, you need to adjust all the parameters marked with the (cm) label accordingly.
Troubleshooting
Interior of the mouth is broken
Make sure that the FacialAnnotation and the result of the R3DS Track detector for the neutral frame are very similar. If they are not similar, adjust your annotation or redo the detection to achieve similar results.
If that doesn’t help, reduce the Detection Weight parameter.
It may also be caused by inaccurate FacialDetection. Use the EditFacialDetection node to manually adjust the results of FacialDetection from the LoadFacialDetection node. If it helps, you need to fix the detection in R3DS Track and export the FacialDetection results again.
Mouth socket has a hole
The method requires that the basemesh has a mouth socket. The mouth socket allows detecting inner lip contours. The contours are defined as a border between one lip and another, or a lip and the mouth socket.
If the mouth socket has a hole in it, and this hole is visible from a front camera, the contour detection algorithm may fail. We suggest using solid mouth sockets. If the mouth socket has a hole, please make sure that the hole is not visible from the front camera connected to the FacialWrapping node.
Noisy scan
To prevent artifacts on noisy scans you can increase the Sampling Radius Final parameter.
The second thing you can try is to increase the Smoothness parameter.
The fit is not very accurate
The fitting of the FacialWrapping node should be clean and robust but doesn’t have to be very accurate as it’s used as initialization for the OpticalFlowWrapping node.
However, you can increase the accuracy of fitting by reducing the Sampling Radius Final parameter. You can also increase the Num Component parameter especially if you are using many blendshape references.
Bad eye fitting
Make sure the your FacialAnnotation curves closely match the result of the FacialDetection exported from R3DS Track for the neutral frame. If they don’t match, try to either adjust the FacialAnnotation or the detection in R3DS Track.
Make sure that your FacialAnnotation for the eyelids is very accurate. We highly recommend putting the eyelid contour exactly on the edge loop corresponding to the eyelash attachment line as opposed to the transition between the eyelid and the sclera. Also make sure that you track the eyelash attachment line (not the border of the sclera) inside R3DS Track.
I want to use reference blendshapes from multiple characters
To do that you need to transfer all the blendshape deltas from different characters onto a single basemesh. Then you can specify this basemesh to be the Neutral Reference and the retargeted expressions as the Blendshape References.
Can’t wrap a specific extreme expression
This probably means that your reference blendshapes don’t contain similar expressions. You can extend the set of reference blendshapes with a new expression to fix that.
You can do that by manually cleaning up the problematic expression using the Brush node and adding the resulting shape to the Blendshape References parameter. If you are using generic blendshapes, you can retarget the cleaned up shape to your generic neutral mesh before adding it to the Blendshape References.